This article has not yet been translated in the language shown. It is displayed in
machine translation, but it may be incorrect.
Create a CSV file using a spreadsheet app like Excel for batch scheduling posts. With the created CSV file, you can add multiple posts to your scheduled posts or drafts up to 18 months in advance.
Creating a CSV file with text only

- Open the downloaded sample file with a spreadsheet app like Excel, or select "File" > "New" from the menu to create a new file.
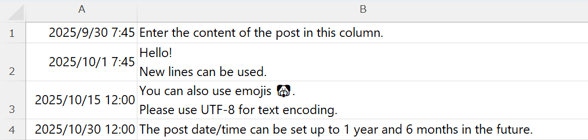
- Enter the date and time you want to post in column A.
- Enter the date and time in the "YYYY/MM/DD HH:MM" format.
- For details, please check How to Format Dates in CSV Files for SocialDog.
- You can specify post dates up to 18 months in advance.
- Enter the date and time in the "YYYY/MM/DD HH:MM" format.
- Enter the post content in column B. Line breaks within cells will be reflected in the post.
- Repeat steps 2 and 3 for the number of posts you want to schedule.
- Select "File" > "Save As" to export the CSV file.
- For file type, select CSV UTF-8. *Please select CSV UTF-8 instead of CSV if you include emojis.
- For details, please check How to Save in UTF-8 or Shift_JIS.
- Enter a file name and save.
- To make long-form posts, you need to subscribe to X Premium (Twitter Blue).
- While it's possible to schedule posts without a subscription, long-form posts will fail at the time of posting if you are not subscribed to X Premium (Twitter Blue).
Creating a CSV File for Batch Import of Posts with Media
With a single CSV file, you can add both media posts and text-only posts together to scheduled posts or drafts.
To batch import posts with media, you need to upload images or videos to the Media Library in advance. For upload instructions, please check How to Upload Media (Images and Videos) to the Media Library.

- Open the downloaded sample file with a spreadsheet app like Excel, or select "File" > "New" from the menu to create a new file.
- Create a CSV file according to the format described in the Input Field Details below.
- Select "File" > "Save As" to export the CSV file.
- For file type, select CSV UTF-8. *Please select CSV UTF-8 instead of CSV if you include emojis.
- For details, please check How to Save in UTF-8 or Shift_JIS.
- Enter a file name and save.
Input Field Details
| Field Name | Example Input | Required/Optional | Notes |
|---|---|---|---|
| Post date/time | 2025/08/21 10:00 | Required | ・Enter date/time in "YYYY/MM/DD HH:MM" format. For details, please check How to Format Dates in CSV Files for SocialDog. ・You can specify post dates up to 18 months in advance. |
| Post Content | This is a sample post | Required | ・Line breaks within cells will be reflected in the post. |
| Media 1 | 20250821_01.jpg | Optional | ・Enter the file name of media you've uploaded to SocialDog's Media Library. ・For details on using the Media Library, please check How to Upload Media (Images and Videos) to the Media Library. ・Always include file extensions (.jpg/.png) in the file name. |
| Media 2 | 20250821_02.jpg | Optional | ・You can specify up to 10 media files per post (X (Twitter) allows up to 4 images). ・X (Twitter): up to 4 ・Instagram・Facebook: up to 10 ・For media header rows, enter "Media 1", "Media 2", … as needed.
|
| Media 3 | Optional | ・If left blank, the post will contain text only | |
| Media 4 | 20250821_04.jpg | Optional | |
| Media 5 | 20250821_05.jpg | Optional | |
| Media 6 | 20250821_06.jpg | Optional | |
| Media 7 | 20250821_07.jpg | Optional | |
| Media 8 | 20250821_08.jpg | Optional | |
| Media 9 | 20250821_09.jpg | Optional | |
| Media 10 | 20250821_10.jpg | Optional |
How to Format Dates in CSV Files for SocialDog
To format dates in CSV files to be compatible with SocialDog, perform the following steps.
- Select the cells where you want to change the date format, then click on Cell Formatting.

- Enter "yyyy/mm/dd hh:mm" in the format field, then click OK.

How to Save in UTF-8 or Shift_JIS
When saving a CSV file, please save it in either Shift_JIS or UTF-8 text encoding format. If the file includes emojis, be sure to select UTF-8.
- Select "File" → "Export" → "Change File Type" → "CSV (Comma delimited)" and then click "Save As" below.

- If your file includes emojis, change the "File Type" to "CSV UTF-8 (Comma delimited) (*.csv)".

- Enter any file name and click "Save".
About line breaks in cells
When editing directly in a text editor, line breaks must be enclosed in "". If you edit in Excel, you don't need to enclose a line break in a cell with "" because it will be converted automatically when CSV is output.
Functions such as the LEN function
LEN function etc. will be converted to text when exporting to CSV.
Please be sure to check your tweets before you register them, as they will be displayed on the confirmation screen after upload.
How to Upload CSV Files
For instructions on how to upload your created CSV files to the "Bulk Import" screen, please check Make a bulk reservation with a CSV file.