Collecting posts with keywords (Keyword Monitor)
With Keyword Monitor, you can collect posts containing pre-set keywords.
You can comment on, Reposts/quote posts, or Likes collected posts.
Overview of Keyword Monitor
Use Cases
It can be used in the following situations:
- Ego search and social listening
- Set your company name or product name
- Hashtag Contests support
- Set hashtags for contest entry requirements
- Social selling / Identifying target reach
- Set your own product name, product name, store name, or product category name
Collectable Posts
Posts from all public X (Twitter) Accounts within the last 30 days
- For languages with multi-language support, only the pre-translation text is targeted.
- Long texts and Hashtags are also subject to search.
- "Last 30 days" refers to the period within 30 days retroactively from the point when [Retrieve Latest Posts] is executed in Keyword Monitor.
- Keyword Monitor uses Full Archive Search, a feature of X (Twitter) Enterprise API.
- It does not support collecting posts from social media other than X (Twitter) (e.g., Instagram).
Restrictions per Plan
You can collect posts within the Retrieval times limit set for each Plan. Therefore, if a large number of posts are made, such as for contest posts, it may not be possible to collect all of them.
With the Enterprise plan, you can collect up to 50,000 posts per month. It can also be utilized for managing Contests where users are asked to Post with specific Hashtags.
The number of posts that can be collected in one retrieval is 500 posts, and the maximum Retrieval times for the last 30 days are as follows:
- Enterprise plan: 100 times (500 posts × 100 times = maximum 50,000 posts can be collected)
- Business plan: 30 times (500 posts × 30 times = maximum 15,000 posts can be collected)
- Professional plan: 10 times (500 posts × 10 times = maximum 5,000 posts can be collected)
Retention Period
Data collected by Keyword Monitor is retained for 2-3 months and regularly deleted.
If you wish to retain it, you can Save it by using CSV download.
Usage Flow
- Create a Keyword Monitor.
- Set search conditions at this time.
- Execute "Retrieve latest posts."
- Check the posts collected by Keyword Monitor in your Inbox.
Adding keywords alone does not collect posts. To collect posts, you must manually retrieve them after setting the keywords.
If you wish for automatic retrieval and Notifications for Keyword Monitor, please contact us.
Set up Keyword Monitor
- Click Inbox from the menu.
- Click Keyword Monitor Settings.
- Click [Add].
- Click [✎] next to New Keyword Monitor and enter the Title.

- Enter the keywords you want to retrieve in the "Keywords" field.
- (Optional) Set conditions using Search options.
- Clicking [Add] completes the settings.
How to Set Search Conditions for Keyword Monitor
Narrowing down keywords as much as possible makes it easier to display posts of interest.
- Set proper nouns such as your own product name, product name, or store name, instead of general nouns.
- Set multiple keywords, such as "diet breakfast".
- Utilize search operators
Keyword Field
- Entering multiple keywords with spaces creates an AND condition.
- If you enter "#diet breakfast", you can retrieve posts containing both "#diet" and "breakfast".
- You can use "Search operators available in Keyword Monitor".
- If you enter "#diet OR breakfast", you can retrieve posts containing either "#diet" or "breakfast".
Search options
Operators cannot be used in Search options.
Post Content
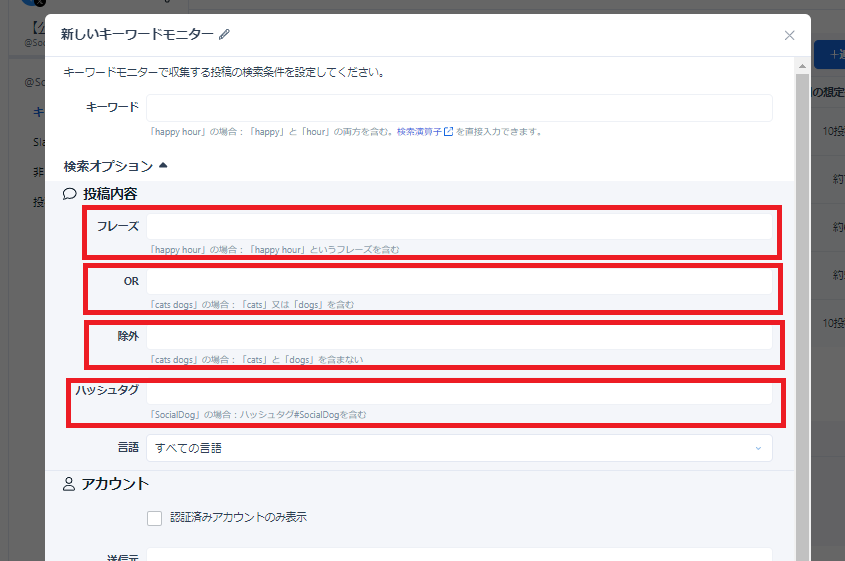
Example) For "SocialDog ソーシャルドッグ", posts containing either "#SocialDog" or "#ソーシャルドッグ" can be retrieved.
- Phrase: Only one phrase can be registered. Example) For "happy hour", posts containing the phrase "happy hour" can be retrieved.
- OR: Multiple keywords can be registered with an OR condition. Example) For "cats dogs", posts containing either "cats" or "dogs" can be retrieved.
- Exclude: Multiple keywords can be registered with an OR condition. Example) For "cats dogs", posts containing either "cats" or "dogs" will be excluded.
- Hashtags: Multiple keywords can be registered with an OR condition. It is not necessary to enter "#". Example) For "SocialDog ソーシャルドッグ", posts containing either "#SocialDog" or "#ソーシャルドッグ" can be retrieved.
Account

・From: Multiple Accounts can be registered with an OR condition.
・To: Multiple Accounts can be registered with an OR condition.
・@tweets: Multiple Accounts can be registered with an OR condition. It is not necessary to enter "@".
Edit Keyword Monitor (Change Search Conditions)
You can Change the name and search conditions of Keyword Monitor. The changed search conditions will be applied to newly retrieved posts.
- Click Inbox from the menu.
- Click Keyword Monitor Settings.
- Click [Edit] for the target Keyword Monitor.
- Edit the desired sections and click [Change] at the bottom right.
After changing the Keyword Monitor settings, the already collected data will continue to be displayed as is.
If you want to Change the search conditions for posts from periods already retrieved, please create a new Keyword Monitor.
Retrieve Latest Posts with Keyword Monitor
Keyword Monitor does not automatically retrieve posts. You can retrieve posts at any time.
Only posts newer than the latest retrieved posts will be retrieved; therefore, posts that were not retrieved once cannot be retrieved with the same Keyword Monitor.
For example, if you retrieve the latest posts with "1,000 posts (consuming 2 Retrieval times)", and there were actually 1,500 target posts, only the latest 1,000 posts will be retrieved, and the remaining 500 will not. If you then retrieve the latest posts, only posts newer than those already retrieved will be obtained, and the remaining 500 posts will not be retrieved.
- Click Inbox from the menu.
- Click the added keyword on the menu.
- Click [Retrieve Latest Posts] at the top of the screen.

- Select [Number of posts to retrieve] from the pull-down menu and click [Retrieve Latest Posts] at the bottom right.
- You can select the Retrieval times depending on the number of posts you want to collect.
- Posts for the added keywords will be collected.
Delete Keyword Monitor
Unnecessary Keyword Monitors can be Deleted.
- From the menu, click [Inbox] → Keyword Monitor Settings.
- Click the [Delete] button for the keyword you want to Delete.
- Check the confirmation message and click [OK].
The number of retrieved items does not decrease even if you Delete the Keyword Monitor.
Check Posts Collected by Keyword Monitor
- Open [Inbox] from the menu.
- The collected posts will be displayed.
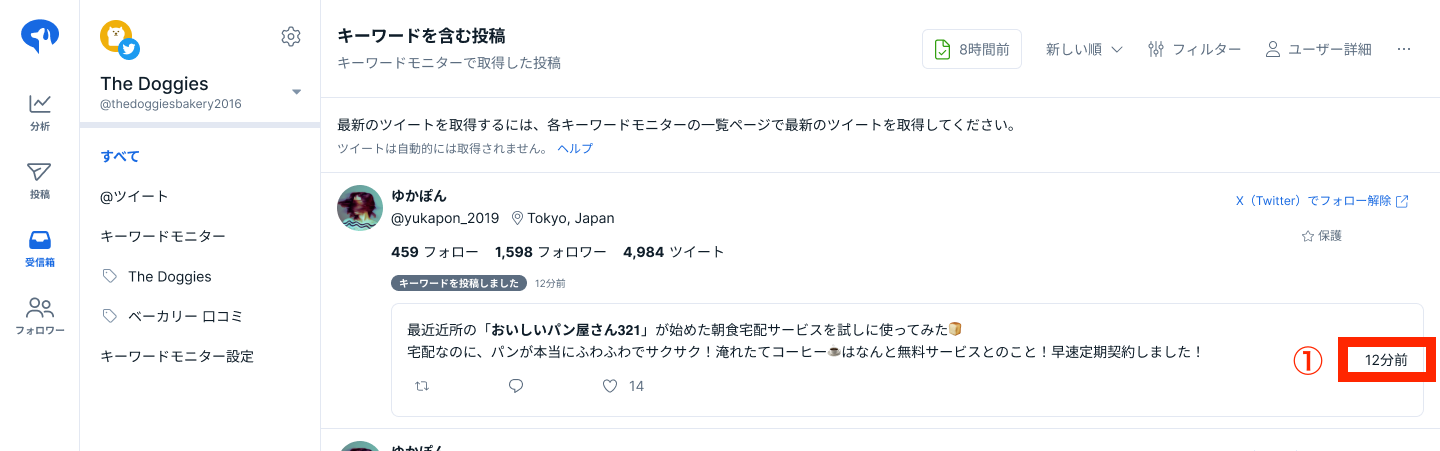
- Reposts and Likes counts displayed are the values at the time of data retrieval.
- For details, please check Data retrieved from SNS and retrieval timing.
- Clicking "Post time" in the ①red frame will take you to the X (Twitter) screen of the target Post.
- Reposts and Likes counts displayed are the values at the time of data retrieval.
Collected posts can be Filtered, sorted, etc. You can also Hide or protect collected users.
For details, please see Filtering users by condition.
Plan Limits
Retrieval times for 30 days
The available Retrieval times (Note 2) for the most recent 30 days (Note 1) vary by Plan.
- Enterprise plan: 100 times
- 500 posts × 100 times = maximum 50,000 posts
- Business plan: 30 times
- 500 posts × 30 times = maximum 15,000 posts
- Professional plan: 10 times
- 500 posts × 10 times = maximum 5,000 posts
Please note that this is not the number of times from the beginning to the end of the month.
Example: If the current date and time is "June 15, 2023 15:00", the remaining Retrieval times at that point will be calculated based on the Retrieval times from "May 16, 2023 15:00" to "June 15, 2023 15:00".
The number of Retrieval times consumed is determined by the actual number of posts retrieved.
Example)
- Retrieval was performed with "Number of posts to retrieve" set to "1,500 posts (consuming 3 Retrieval times)"
- The actual retrieved data result was "700 posts" → The Retrieval times consumed will be "2 times". Retrieval times for unretrieved portions are not consumed.